There’s a primal connection to cooking over an open fire. It’s an opportunity to unplug from the fast-paced, high-tech world that consumes us. Outdoor cooking is a part of our DNA; it soothes the soul and allows us to enjoy the unhurried process of preparing a meal surrounded by nature.
The immersive and tactile experience is second only to the flavors and aromas that come from this style of cooking. Whether you’re whipping up breakfast, grilling fruit, or searing a juicy steak, they become exceptionally delicious when cooked over an open flame, elevating their flavor profile to new heights.
We’ve gathered our favorite, simple recipes that will work on your family’s charcoal grill, a campfire, or a fire pit grill.
Open Fire Chicken Wings
 The smokey aroma and caramelized texture achieved through cooking chicken wings over an open fire is beyond compare. The high heat and direct flames of the fire help to create a crispy exterior while keeping the inside juicy and tender.
Renowned Chef and Sea Island Forge enthusiast Jay Ducote shows you how to get rich flavors by soaking wings in a salty (and sometimes sweet) brine. These aren’t the greasy, deep-fried wings you get at the sports bar.
He says, “There's something about the kiss of the open flame that sets the grilled wing apart from others.” We couldn’t agree more! Here’s how to brine, toss, and heat your way to flame-kissed deliciousness.
Pro Tips:
- Brines are all about flavor preference. If you don’t have a favorite, there are a number of recipes out there. Jay is a fan of sweet tea brine, but you can have fun finding your flavor profile using beer, wine, fruit juices, and apple cider vinegar, among other options.
- Similar to brines, rub preferences vary. You can make your own using recipes online or buy amazing pre-made products like these from Southern Soul Barbeque or Burnt Finger BBQ.
- Try to limit sugars (even brown sugar) in your rub. Sugar cooks quickly and can give your wings an over-charred, bitter flavor if overcooked on your outdoor fire pit.
Ingredients:
- 4 pounds whole chicken wings (About 14 wings)
- About 6 cups of your favorite brine (enough to fully submerge your wings)
- About 6 ounces of chicken dry rub
Directions:
- Remove the thawed wings from the packaging and place them in a covered container or Ziploc bag. Pour the brine over the wings and allow them to soak up the flavor for at least 4 hours.
- After brining, remove the wings and pat them dry. Generously apply your dry rub of choice and let them sit out while preparing the fire in your fire pit. It should take about one hour for wood to burn down to the proper temperature (around 375° Fahrenheit) in your fire pit.
- Grill the wings over direct heat (well-established coals, not live flames), but adjust the height of your cooking grate or swing it to the side if the flame gets too strong. You want the skin on the wings to get crispy but not burnt or cracked. Use tongs or to turn the wings and ensure they cook evenly to an internal temperature of 165F. Covering your grill on your outdoor fire pit with a Grill Dome will speed up the cooking time and provide additional smokey flavor.
Chargrilled Oysters With Spicy Tarragon Butter
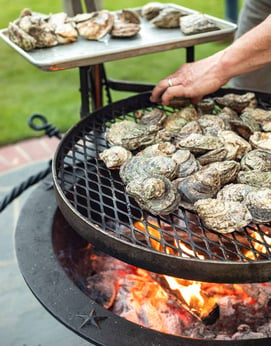 Oysters can be enjoyed raw, steamed, or cooked in various ways. If you ask us, though, you haven’t eaten an oyster until you’ve had one cooked over an open flame. The smoke and char add so much to this delightful mollusk's delicate, briny flavor that you may never return to eating them any other way.
You can always lay oysters on the grill until they pop open, shuck, and enjoy, but this recipe for grilled oysters with spicy tarragon butter from Bobby Flay, courtesy of Food & Wine, will have you going back to the seafood market over and over.
Pro Tips:
- You can prepare the tarragon butter up to five days in advance and store it in your refrigerator.
- Tarragon can be replaced with basil, oregano, or other spices to suit your flavor profile.
- Be attentive to your oyster shells popping open the first time you put them on the grill. Overcooking the oyster will give it a chewy texture and make it harder for the butter to penetrate the meat.
Ingredients:
- 2 sticks unsalted butter, softened
- 3 tablespoons chopped tarragon
- 2 tablespoons hot sauce
- ½ teaspoon kosher salt
- ¼ teaspoon freshly ground pepper
- 3 dozen medium to large oysters
Directions:
- Light your wood or charcoal burn down for an even layer of hot coals. Oysters cook best at high heat (between 500° and 600° Fahrenheit), so you will want to be ready to put them on the grill soon after the flames die down when the coals are at their hottest.
- In the meantime, combine the butter, tarragon, hot sauce, salt, and pepper in a food processor until blended.
- Transfer the tarragon butter to a sheet of plastic wrap and roll it into a 2-inch-thick log.
- Refrigerate the butter for about 15 minutes until firm, then slice the log into 36 equal parts.
- Place the oysters directly on your grill, put the cover on, and cook until the oysters open (you might hear a pop).
- Use tongs to place oysters on a platter, being careful to keep the liquid inside.
- Remove the top shells quickly and loosen the oyster meat from the bottom shells.
- Place a pat of your tarragon butter on each oyster and return them to the grill.
- Cover the grill and cook for about 1 minute until the butter is melted.
- Enjoy immediately!
Grilled Pineapple with Cream
 Although open-fire cooking is often associated with meat, it's also possible to explore new culinary horizons by infusing rich, smoky flavors into fruits to create a delicious side dish or to turn them into a decadent dessert or cocktail.
The natural sweetness of the pineapple is enhanced by the caramelization that occurs from grilling over an open flame, creating a mouth-watering combination of flavors. Whether you're hosting a backyard BBQ or just looking for a sweet treat to enjoy, grilled pineapple is a must-try recipe sure to impress.
Ree Drummond, also known as the Pioneer Woman, presents a delightful recipe for grilled pineapple with a delectable homemade whipped cream topping guaranteed to add a touch of tropical flavor to your campfire feast.
Pro Tips:
- Pineapples aren’t the only fruit that tastes great on the grill. Peaches, melons, pears, bananas, and many other fruits that are fairly firm and not overripe will give you delicious results too. Creativity and trial and error are your friends.
- Since most fruit is fairly fragile, large chunks, slices, and wheels are advisable to help the fruit maintain its structure while heated.
Ingredients:
For The Pineapples:
- 1 large pineapple, peeled and cored
- 2 limes, juiced (zest and save for whipped cream)
- 1 tablespoon dark agave syrup
- 2 tablespoons coconut rum
- Pink kosher salt
- 1 tablespoon olive oil
For The Whipped Cream:
- 1 cup heavy cream
- Lime zests
- 1 tablespoon dark agave syrup
Directions:
- Prepare your outdoor grill by arranging your coals evenly and positioning your grate for medium heat. This will typically take about 45 minutes for a charcoal grill or one hour for a fire pit. Adjust the height of your grill grate accordingly to achieve desired cooking temperature.
- Slice the pineapple into 1-inch rounds and place in a large bowl.
- Mix the lime juice, coconut rum, agave syrup, and salt in a small bowl. Once combined, gently toss over the pineapple and let the mixture marinate for at least 20 minutes.
- Brush your grill grates liberally with olive oil and grill the pineapple for about 3 minutes per side. Your pineapple should remain firm but have noticeable grill marks.
Whipped Cream:
- Add the heavy cream, agave syrup, and lime zest to the bowl of an electric mixer. Use the whisk attachment to whip the mixture for 2-3 minutes or until stiff peaks form.
- Top the grilled pineapple generously with whipped cream and, if desired, drizzle with agave syrup and scatter mint leaves to serve.
Ribeye Steak with Chimichurri Rojo
 Few things can rival the mouth-watering aroma and taste of a perfectly cooked ribeye steak, especially when paired with a flavorful sauce. In this recipe, we take it up a notch with a delicious chimichurri rojo sauce made from a blend of fresh herbs and spices.
This sauce, paired with the juicy and tender texture of the ribeye steak, creates a culinary masterpiece that is sure to impress your guests. Unlike the usual chimichurri sauce, the rojo variant introduces the heat and smokey flavor of paprika, cayenne peppers, and bell peppers.
With the guidance of James Beard nominee and southern cuisine expert Rob McDaniel, you can confidently bring this dish to your table and experience a truly unforgettable dining experience.
Pro Tips:
- Room-temperature steaks cook better, so pull them out of the refrigerator 1-2 hours before you plan to put them on the grill.
- Pat down your meat with paper towels prior to putting it on the grill, and try to get it as dry as possible so you can get the best crust on your sear.
- Resting your meat after cooking is the secret to a juicy steak. Chefs recommend keeping the steak warm and waiting anywhere from half to the full amount of time you spent grilling your steak prior to slicing.
Ingredients:
For The Steak:
- 4 1-inch thick bone-in ribeyes
- 8 teaspoons peanut oil
- Kosher salt
- Fresh cracked pepper
For The Chimichurri Rojo
- 1 cup sherry vinegar
- 1 tablespoon smoked paprika
- 1 tablespoon Hungarian paprika
- 1 head of garlic, minced
- ½ red onion, minced
- ¼ cup thinly sliced scallion
- ½ teaspoon cayenne pepper
- 1 tablespoon freshly ground cumin
- 1 tablespoon freshly ground coriander
- Zest and Juice From 1 Orange
- 2 roasted red bell peppers, peeled and small diced
- 1 cup extra virgin olive oil
Directions:
- Prepare your fire and build a hot coal bed– if using wood let it burn for about an hour to create coals, if using charcoal about 30-45 minutes. (Tip: prepare the chimichurri while you wait!).
- Place the grilling surface as close to the coals as you can get it and allow it to heat for a few minutes.
- Oil the steaks with 1 teaspoon oil on each side, then season with Kosher salt and fresh cracked pepper.
- Raise the grilling surface to around 6 inches from the coal bed and place the steak on the grilling surface. (This is where using the Sea Island Forge grilling attachment becomes key; you have the ability to control the cooking temp by easily raising or lowering the grilling surface up and down, so you can dance on the edge of too hot, achieving an amazing crust that is normally thought of with a steak cooked under a high temp broiler.)
- Cook the first side for 5 minutes, then flip using Pigtail for an additional 3 minutes until the internal temperature reaches 125-130 degrees Fahrenheit.
- Remove from the grill and rest the steak in a warm place for 10-15 minutes, at which time it will carry over to reach a perfect medium rare.
- Once the meat has rested, slice the steak and serve it with chimichurri rojo.
Chimichurri Rojo:
- Mix everything together with ½ cup of olive and allow to sit at room temp for 1 hour.
- Whisk in the remaining ½ cup extra virgin olive oil. Season with salt and pepper to taste.
- Serve at room temperature, either drizzled lightly over the sliced steak or pooled beside it.
Fire-Grilled Flat Bread Pizza
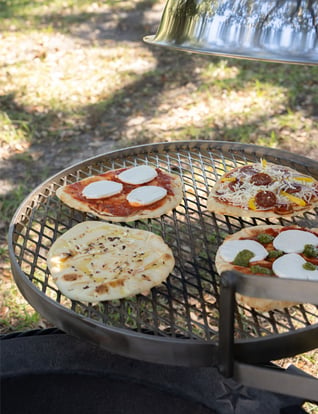 Who says you need an oven to enjoy incredible pizza? With your wood fire pit and some store-bought Naan Bread, guests of all ages can enjoy a new twist on this family favorite. We recommend setting up a topping station where each personal pizza can be quickly customized. The flatbread pizzas cook fast, making it a perfect meal for hungry adults and kids in less than 15 minutes.
We’ve consolidated two versions of flatbread pizza; savory and sweet. One of our favorite discoveries is a dessert flatbread spread with mascarpone cheese, your family’s favorite chocolate, and topped with fresh berries.
Pro Tips:
- If you want to make a traditional pizza using a dough crust, you’ll need a pizza stone. We recommend putting the dough on a cold pizza stone to prevent burning the bottom of the pizza.
- To skip the sauce and enjoy a flatbread instead, toast both sides of the Naan on the grill first, drizzle a little bit of olive oil, and add your toppings before placing the Naan back directly on the grill surface.
Savory
Ingredients:
- Naan bread
- Fresh mozzarella cheese
- Pizza sauce
- Chili flakes
- Pepperoni
- Red onion
- Yellow bell pepper (add a dollop or two fresh pesto for a fun twist!)
- Olive oil
Directions:
- Lightly coat one side of the Naan with olive oil, and place it oil-side down on the grill that is preheated to about 450° Fahrenheit. Charcoal burning for 45 minutes or wood burning for about an hour should be around this temperature.
- Toast until grill marks appear.
- Remove from the grill and flip the toasted side up, then spread the Naan with sauce and top with cheese and toppings.
- Place the Naan back on the cooking grate, cover the grill, and let it soak up smokey flavor for about 7 minutes until the cheese is melted and the bottom is golden brown.
Sweet
Ingredients:
- Naan Bread
- Mascarpone
- Condor Chocolate Chips
- Raspberries
- Honey
Directions:
- Toast one side of the Naan on the Grill before adding toppings to the pizzas.
- Remove, flip the toasted side up, and spread the Naan with chocolate and mascarpone cheese and toppings of choice.
- Place the Naan back on the grill with the Heat Dome until the chocolate is melted and the bottom is golden brown (about 7 minutes).
Open-Fire Pancakes and Bacon
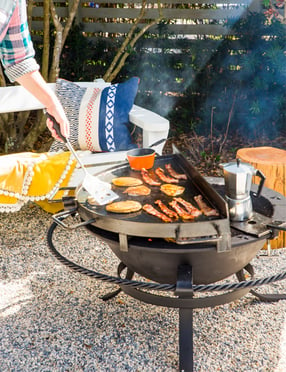 Nothing gets the day going like a tasty, hearty breakfast. Adding smokey flavors to traditional breakfast staples will open your eyes and fuel you up for the day ahead. If you ask us, there’s nothing better than a pioneer-style breakfast over an open fire. Pour a cup of coffee, light your coals, and invite the family out to the fire pit. This will be one of their favorite breakfasts. Make sure you have a Flat Top Griddle or a large cast-iron skillet for this go-to breakfast recipe.
Pro Tips:
- No griddle? No problem. You can achieve similar results using cast iron cookware placed directly on your grill grate or Side Kick. We’re big fans of Smithey Ironware.
- Combine the bacon grease and butter before cooking your pancakes. You can thank us later.
Ingredients:
- Thick-cut bacon (or your favorite cut!)
- Pancake mix (we recommend Blackberry Farm Southern Grain Griddle Cake Mix)
- Salted butter
- Maple syrup
- Your favorite pancake toppings
Directions:
- Light your fire and let the charcoal burn down for about an hour or the wood for about one hour and 15 minutes to achieve an optimal cooking temperature of around 375° Fahrenheit.
- Arrange coals underneath your griddle so that medium heat is spread evenly. We recommend cooking the bacon first, as it cooks best when started on a cool surface.
- Prepare your pancake mix.
- Lay bacon flat on the griddle. Use Pigtail grill tool to flip it after about 5 minutes, then cook to desired crispiness. If your bacon begins curling, your cooking surface is probably too warm.
- While your bacon is cooking, add a generous amount of butter and spread it evenly across the griddle on top of the delicious bacon grease.
- Before the butter browns, pour the pancake batter into the butter/bacon fat and wait for the bubbles in the batter to appear.
- Once you see the bubbles (about 1 minute), flip the pancakes and cook until golden.
- Serve with maple syrup and any other toppings you prefer.
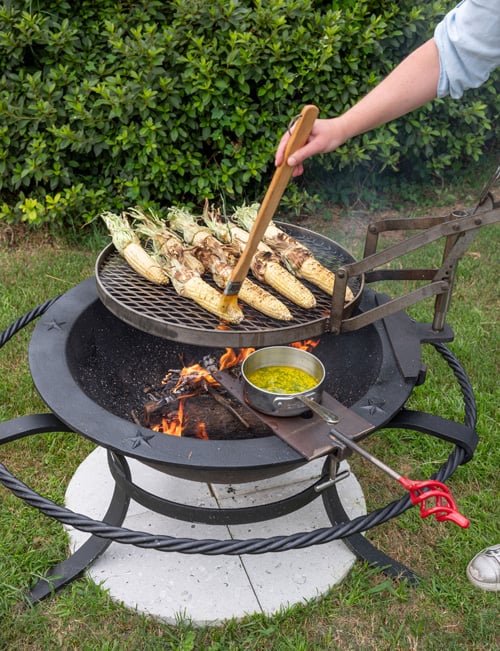
Grilled Corn on the Cob
 Corn on the cob might be the perfect side for most meals cooked over an open flame. You can have fun with this traditional side by seasoning your corn with a sweet or savory blend of spices.
If you’ve tried to grill corn in the past, you might have struggled with burning this sweet vegetable. We recommend either wrapping the corn in aluminum foil or keeping the husks on to lock in the flavor and use the naturally occurring steam to slow-cook your corn.
Our friends at Splendid Table have provided this recipe for grilled marjoram-scented corn to get delicious, aromatic corn from your wood fire pit every time.
Pro Tips:
- Marjoram can be substituted for lemon thyme sprigs or another aromatic herb aligned with your flavor preferences. (3)
- You can test the corn's doneness while cooking by piercing a kernel with the tip of a pairing knife or fork. The tip should go in easily when the corn is ready but still pop slightly. (3)
- The husks may char or split apart while cooking, but the corn will still be fine. As a bonus, it makes removing the husks even easier. (4)
Ingredients:
- 6 ears of fresh sweet corn in their husks
- 3 tablespoons of unsalted butter, softened
- 24 3-inch sprigs of marjoram
- Sea salt
Directions:
- Light your fire pit or charcoal grill, then wait about one hour for charcoal, or about 75 minutes for wood coals, to work their way down to a grilling temperature around 375° Fahrenheit.
- Prepare the corn by peeling back the husk, making as few tears as possible, and keeping it attached at the bottom. Remove and discard the silk.
- Smear ½ tablespoon of butter over each ear, then press the marjoram sprigs into the butter.
- Pull the husk back into place, completely covering the kernels. Tear off a 1-inch wide piece of husk and tie it around the end of the ear to keep the husk closed.
- Arrange the corn on the grill rack away from the coals and cover the grill. Cook for 10-20 minutes. Use tongs to turn the ears occasionally. Cook times will vary depending on the grill's heat, the corn's tenderness, and your preference.
- When ready to serve, unwrap the corn and remove the marjoram so your guests can easily enjoy it.
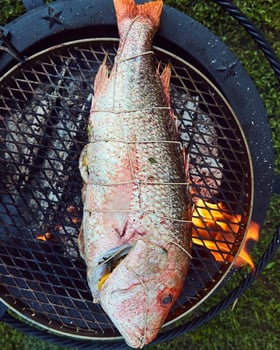 Whole Fish on the Grill
Grilling fish over an open fire can be more challenging than cooking other meats like steak or chicken, but the payoff is definitely worth it. The combination of delicate seafood flavors infused with the smokey essence of the fire creates a flavor explosion that will leave you wondering why you hadn't tried it sooner.
If you enjoy crispy fish skin, you'll be thrilled to know that the heat from your outdoor firepit can cook it to perfection, surpassing even the crispiest pan-seared fish you've ever tasted.
In this whole fish recipe, James Beard Award-winning Chef Ashley Christensen reveals her techniques for making juicy, smokey grilled fish.
Pro Tips:
- Skin sticking to the grate is the most common problem outdoor chefs experience when grilling fish. If the skin is sticking, it isn’t done yet. Continue to try every 30 seconds until the fish lifts easily.
- Skin may stick if you cook a fish while it is still cold because it releases steam that keeps the skin from charring properly.
- Avoid the temptation to constantly check how your fish is cooking. Too much poking and prodding, especially in the first few minutes on the grill, will cause the fish to break down and fall apart. (5)
Ingredients:
- 12-15 lb. NC Golden Tilefish (scaled/cleaned/fins snipped/gills removed)
- 3 lemons
- 2 bunches fresh thyme on the sprig
- 4 fresh bay leaves
- 1 small head fennel (with fronds)
- 1 bunch Italian flat-leaf parsley
- ½ cup extra virgin olive oil
- Black peppercorn in a grinder
- Kosher salt
- 10 16-inch pieces of butcher’s twine
- Neutral cooking oil
Directions:
- Slice lemons in half, then into ¼-inch thick half moons. Cut the thyme sprigs into 1-inch long pieces. Thinly slice the bay leaves. Slice the fennel bulbs and stems into ⅛-inch thick slices. Chop the parsley into 1-inch-long pieces.
- Mix the above ingredients with 1 tablespoon of kosher salt, about 40 cracks of fresh ground pepper, and ½ cup of olive oil. Set aside.
- Season the fish inside and out with kosher salt using about twice the amount you would normally season a filleted side of fish with.
- Stuff the herb and citrus mixture into the fish's cavity and the area where the gills were. Pack it tightly.
- Tie the fish shut with the butcher’s twine, spacing your ties out every 2 inches. Tying your knots near the fish’s spine will help maintain its structure.
- Burn a pile of hardwood logs in your fire pit grill for about one hour until you have a large, glowing bed of embers at medium-high heat (375°-450° Fahrenheit). Lower the grilling surface close to the coals and raise back up once hot.
- Rub the grilling surface down with neutral cooking oil. Place the fish on the grill and lower it down to the coals for about 5 minutes to create a sear. Raise the grilling surface back up and use two spatulas to flip the fish carefully after ensuring the skin isn’t sticking. Lower the grill back down to the coals and duplicate the sear of the first side.
- Raise the fish back up, then cover it with the Sea Island Forge Heat Dome, slow roast it until it is 145 degrees Fahrenheit and/or fork tender at the bone on the thickest part.
- Lower the fish back down to the coals, roast for five more minutes with the dome on to lock in smokey flavors, and fully crisp the skin.
- Raise the grill back up and swing it away from the fire. Have a friend hold a sheet tray and lift the fish onto the tray using two spatulas. Allow the fish to rest for 15 minutes, then snip and remove the butcher’s twine.
- Present the fish whole and use two large spoons to slide the meat off of the rib cage.
These dishes are just a few of our favorites. Now that you have seen how simple it can be to prepare breakfast, seafood, sides, steaks, and chicken over an open flame, we hope you are inspired to light up your outdoor fire pit and get cooking today.